Overview
Uploading content from your computer to your hosting account can be accomplished in many different ways. Scroll down to read about some of the more common approaches to adding Files and Folders to your account:
- Using the File Manager in cPanel
- Using an FTP client such as Filezilla or Cyberduck
- Using WebDisk to mount a network folder to your computer
Before we outline these approaches, it’s probably best to explain how the folder structure in your hosting account works. When you are looking at the files for your hosting account for the first time, you’ll see a handful of folders that should look similar to the screenshot below:

Most of these folders are system folders used by cPanel for things like login credentials, e-mail accounts, and temporary files. The main folder that you’ll likely need to work with is the public_html folder. This is the folder that contains files for your account's primary site/domain.
Files uploaded into the public_html folder will be accessible at the root of your domain. For example, if image.jpg was a file in your public_html folder, it would be viewable at yourdomain.com/image.jpg.
Folders within your public_html folder will create “subfolders” for your domain. An example of this would be a "blog" folder with the image.jpg file inside it. This would be viewable at yourdomain.com/blog/image.jpg.
Using the File Manager in cPanel
Within your control panel (cPanel) you have access to a web-based File Manager which allows you to do basic functions like upload, download, and move the files and folders around within your account.
You can choose to have the File Manager display hidden files such as .htaccess files and .git folders by selecting Settings in the top right and then Show Hidden Files (dotfiles)

The File Manager has a variety of tools and functions listed across the top of the screen.
When any of them are chosen the action will be taken on the active folder or the file selected in the main window on the lower-righthand side.
For example, choosing a file and clicking the Rename icon will open a popup to rename that file.
Note: When performing any functions in the File Manager here, you are directly modifying your hosting account. Please use caution with functions like deleting files or folders. Mistakes made here could render your site inaccessible and there is no undo button. The only real option for bringing back deleted files would be through Jetbackup, which you can learn more about here.
To upload files, navigate to the folder you would like the file to be uploaded to and click upload. If you want to upload a folder or multiple files at once, you need to upload a compressed or .zip file.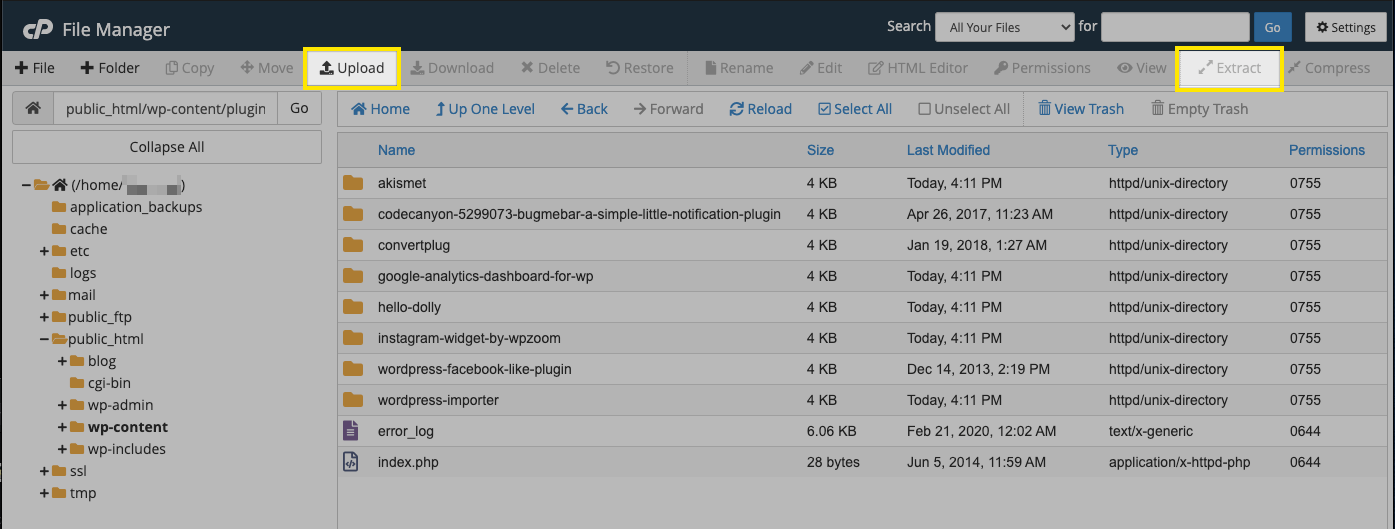
After uploading a zipped file, you will need to extract it.
Using an FTP Account such as Filezilla or Cyberduck
While the File Manager in cPanel is great for quick tasks, it is not as good at doing multiple tasks like uploading several folders full of files or making a lot of changes. In addition, the changes you’re making there are live on the server.
For that reason we often recommend working with an FTP client. FTP stands for File Transfer Protocol and there are a lot of applications that will work with it and connect to our server (here is a comprehensive guide all about FTP). Filezilla and Cyberduck are just two popular free FTP clients, but any will work.
FTP Username and Password
To connect to your hosting account you’ll need to have an FTP username and password. An FTP account is created for you when your hosting account is provisioned and the credentials are emailed to you (the username is typically the first 8 characters of the domain name). If you’re unsure what the username and password are you follow this guide to find them.
Connecting via FTP
For the purposes of this tutorial we’ll be using Cyberduck as the interface but any program should have a similar set of options. When you open Cyberduck, you will see the option to "Open Connection" at the top of the window. Click that to open a connection:
Next you will need to choose the connection type, and you'll need to enter your server, username, and password.
If you are using the default FTP account for your account, then you will connect using the SFTP protocol and Port 22. (For additional FTP accounts, you'll use FTP-SSL and Port 21.)
To find the server and username, you can got to cPanel > Files > FTP Accounts.
On the FTP Accounts page, click the Configure FTP Client link next to the account you want to use, and then the FTP client details will open below. If you're unsure what the password is, follow this guide to find it.
Once you have all the necessary details, enter them into Cyberduck and click Connect.
Once connected to your account you will see the file structure for your account:
You can open folders by clicking on the arrow next to the folder's icon. You can the right-click on any file to bring up the list of actions that can be taken for that file:
Upload Files via FTP
You can upload local files and folders by clicking on Action and then choosing Upload from the drop-down options. This will allow you to search for the file you want to upload.
Alternatively, you can simply drag and drop a file or folder from your computer into the folder within Cyberduck to start the upload.
Once the upload begins, you will see its progress in the Transfer window:
Keep in mind that files must be in the public_html folder in order to be accessible on your primary site's URL.
Download Files via FTP
You can also go in the opposite direction and download folders and files by right-clicking and choosing Download to download them to your local machine. Other options like renaming or moving files and folders are available from the context menu when you right-click.
Using this process allows you to edit and save your files locally and then upload copies to your hosting account, ensuring you always have a local backup of the changes you make. It’s also a quick way to move a large set of files and folders to and from your account.
More information about setting up FTP is available from our FTP documentation.
Using Web Disk to mount a network folder to your computer
Another convenient way of working with the files and folders of your account is to mount a network drive using a tool called Web Disk in cPanel. Web Disk is a fancy name for a standard protocol called WebDav and functionality is built into most operating systems including Mac and PC. cPanel provides shortcut scripts to setup your computer with a network folder by clicking on the Web Disk icon in cPanel and then Access Web Disk. You’ll need to know what operating system version you are using to download the appropriate script. Once you’ve run the script you’ll be prompted for a username and password which would be the same as your FTP account. This will mount a network drive to your computer with full access to the folders and files on the server, allowing you to drag and drop, rename, and delete items as you would any other folder on your computer. If the script doesn’t work, cPanel also provides the settings to connect manually below the download link.